1.Spring Framework
Spring is a lightweight framework. It can be thought of as a framework of frameworks because it provides support to various frameworks such as Struts, Hibernate, Tapestry, EJB, JSF etc.
2.Dependency Injection
These are the design patterns that are used to remove dependency from the programming code. They make the code easier to test and maintain
3.IOC Container[IOC - Inversion Of Control ]
In Spring framework, IOC container is responsible to inject the dependency. We provide meta-data to the IOC container either by XML file or annotation.
4.Spring Modules
The Spring framework comprises of many modules such as core, beans, context, expression language, AOP, Aspects, Instrumentation, JDBC, ORM, OXM, JMS, Transaction, Web, Servlet, Struts etc. These modules are grouped into Test, Core Container, AOP, Aspects, Instrumentation, Data Access / Integration, Web (MVC / Remoting)
1.Steps to Create Sample Applciation
- Create SpringBean class with setters/getters and Methods if want
- Configure SpringBean.xml, with <bean id=”” class=””> and setters as <property name="name" value="Satya">
- Create MainClass by craeting BeanFactory, and getBean()
(1)core.xml
The bean element is used to define the bean for the given class. The property subelement of bean specifies the property of the Bean class named name. The value specified in the property element will be set in the Bean class object by the IOC container.
(2)MainClass
- The Resource object represents the information of core.xml file.
- The Resource is the interface and the ClassPathResource is the implementation class of the Reource interface.
- The BeanFactory is responsible to return the bean.
- The XmlBeanFactory is the implementation class of the BeanFactory.
- There are many methods in the BeanFactory interface.
- One method is getBean(), which returns the object of the associated class.
Flow
- when Beanfactory container is Activated, the entries Of SpringConfiguration file will be verified by using SAXXmlParser
- BeanFactory Conatiner load Bean class , based on id=”ob”
- BeanFactory container creates Bean object based using 0-param constructor
- by using name in property BeanFactory calls SetName(-) on Bean Object performs Setter Injection
2.IoC Container
The IoC container is responsible to instantiate, configure and assemble the objects. The IoC container gets informations from the XML file and works accordingly. The main tasks performed by IoC container are:
- to instantiate the application class
- to configure the object
- to assemble the dependencies between the objects
There are two types of IoC containers. They are:
1.BeanFactory:
The XmlBeanFactory is the implementation class for the BeanFactory interface. To use the BeanFactory, we need to create the instance of XmlBeanFactory class as given below:
Resource resource=new ClassPathResource("applicationContext.xml");
BeanFactory factory=new XmlBeanFactory(resource);
The constructor of XmlBeanFactory class receives the Resource object so we need to pass the resource object to create the object of BeanFactory.
2.ApplicationContext(J2EE and Web)
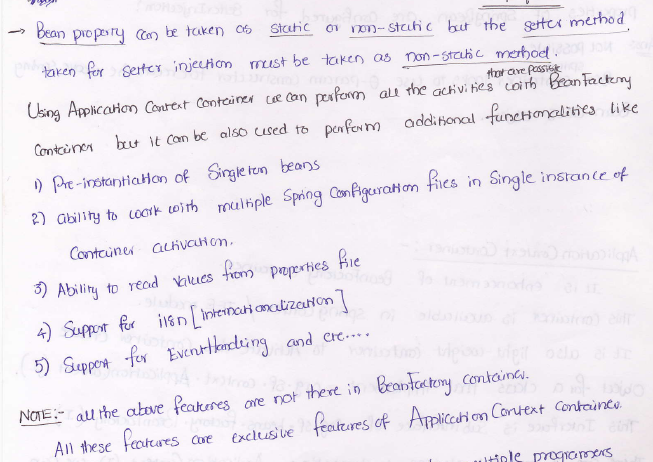
org.springframework.context.ApplicationContext interfaces acts as the IoC container. The ApplicationContext interface is built on top of the BeanFactory interface. It adds some extra functionality than BeanFactory such as simple integration with Spring's AOP, message resource handling (for I18N), event propagation, application layer specific context (e.g. WebApplicationContext) for web application. So it is better to use ApplicationContext than BeanFactory.
ApplicationContext context = new ClassPathXmlApplicationContext("applicationContext.xml");
3.Dependency Injection in Spring
Dependency Injection (DI) is a design pattern that removes the dependency from the programming code so that it can be easy to manage and test the application. Dependency Injection makes our programming code loosely coupled.
(i)Dependency Lookup
The Dependency Lookup is an approach where we get the resource after demand
Ex1: A obj = new AImpl(); → In such way, we get the resource(instance of A class) directly by new keyword
Ex2: A obj = A.getA(); → we get the resource (instance of A class) by calling the static factory method getA().
Problems of Dependency Lookup
two problems of dependency lookup.
1.tight coupling: The dependency lookup approach makes the code tightly coupled. If resource is changed, we need to perform a lot of modification in the code.
2.Not easy for testing:it creates a lot of problems while testing the application especially in black box testing.
(ii)Dependency Injection
The Dependency Injection is a design pattern that removes the dependency of the programs. In such case we provide the information from the external source such as XML file. It makes our code loosely coupled and easier for testing. In such case we write the code as:
In such case, instance of Address class is provided by external souce such as XML file either by constructor or setter method.
Spring framework provides two ways to inject dependency
1.By Setter method → <property name=”name” value=”val” / ref=””>
2.By Constructor → <constructor-arg value=”” type=”” /ref=””>
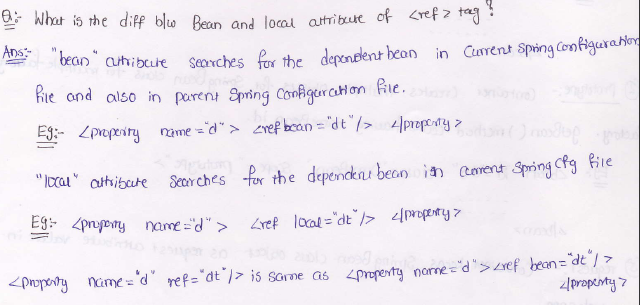
</ref>--> is used for Referring another Object
2.Setter Injection
We can inject the dependency by setter method also. The <property> subelement of <bean> is used for setter injection. Here we are going to inject
- primitive and String-based values
- Dependent object (contained object)
- Collection values etc.
1.primitive and String-based values Injection
2.Setter Injection with Dependent Object
we can inject the dependency of another bean using setters. In such case, we use property element. Here, our scenario is Employee HAS-A Address. The Address class object will be termed as the dependent object
3.Collection values Injection
We can inject collection values by constructor in spring framework. There can be used three elements inside the constructor-arg element.
1.list 2.set 3.map 4.Properties
Each collection can have string based and non-string(Object) based values.

1.List Injection
2.Set Injection

Same as List, but here it wont accept Duplicates
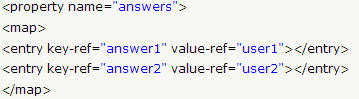
3.Map Injection

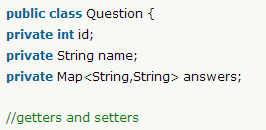
2.Constructor Injection
We can inject the dependency by constructor. The <constructor-arg> subelement of <bean> is used for constructor injection. Here we are going to inject
- primitive and String-based values
- Dependent object (contained object)
- Collection values etc.[List,Set,Map, Properties]
If you have more then One construcrtor , then we must Difine with new Object
In <constructor-arg value=”” type=””> , if u wont specify “type” then default is String
1.primitive and String-based values
2.Dependent object Injection
If there is HAS-A relationship between the classes, we create the instance of dependent object (contained object) first then pass it as an argument of the main class constructor. Here, our scenario is Employee HAS-A Address. The Address class object will be termed as the dependent object.
1. If one object is declared in other class as a varibel.that situation is known as Dependent Object
2. Suppose Address is class and Employe is another class.Adress object is declared as a datamember in Employe class
3. Inthat situation in xml we create <bean id=”ob1”> for Address propeties and then we craete
4. <bean id =”employ”> and in <contructor-arg ref=”ob1”>
3.Collection values Injection
We can inject collection values by constructor in spring framework. There can be used three elements inside the constructor-arg element.
1.List Injection
2.Set Injection 4.<prop/>: properties File


3.Map Injection

4.Difference between constructor and setter injection
1.Partial dependency: can be injected using setter injection but it is not possible by constructor. Suppose there are 3 properties in a class, having 3 arg constructor and setters methods. In such case, if you want to pass information for only one property, it is possible by setter method only.
2.Overriding: Setter injection overrides the constructor injection. If we use both constructor and setter injection, IOC container will use the setter injection.
3.Changes: We can easily change the value by setter injection. It doesn't create a new bean instance always like constructor. So setter injection is flexible than constructor injection.
5.Spring Bean Autowiring
by default autowiring is disabled in spring framework. It means the programmer has to explicitly wire the bean properties into an xml file
If autowiring is enabled then spring container will take care about injecting the dependencies, programmer no need to configure into an xml file explicitly.
Autowiring is only supported if the dependancies are in the form of objects only, to enable autowiring, we should add autowire attribute to the bean element [or] bean tag, autowire has the following values
- byName
- byType
- Constructor
- autoDetect
- none
1.byName[ ID comparision]
In this case, spring framework attempts to find out a bean in the configuration file, whose id is matching with the property name to be wired
If a bean found with id as property name then that class object will be injected into that property by calling setter injection
we have written autowire=byName, so first it will checks for the class with id name addr [as we have written private Addr addr in Emp.java ] and inserts addr class [ Addr.java ] properties into that object and then injects values city,state into name property of Categories class.
2.ByType[CLASS TYPE comparision]
in byName it's compiars and Injects by ID, but here it's compairs class type
3.constructor
Spring Autowiring by constructor is similar to spring autowiring byType [ internally it will considers as byType only ] but with little difference, in byType we used setter injection here we have to use :-)

4.autoDetect
Actually spring autowire=”autodetect” frist will works as Spring Autowiring constructor if not then works as Spring Autowiring byType, byType means setter injection


Spring AOP [Module-II] java4s.good
AOP breaks the program logic into distinct parts (called concerns). It is used to increase modularity by cross-cutting concerns.
A cross-cutting concern is a concern that can affect the whole application and should be centralized in one location in code as possible, such as transaction management, authentication, logging, security etc.


1.AOP Implementations
AOP implementations are provided by:
- AspectJ
- Spring AOP
- JBoss AOP
2.Spring AOP
Spring AOP can be used by 3 ways given below. But the widely used approach is Spring AspectJ Annotation Style. The 3 ways to use spring AOP are given below:
- By Spring1.2 Old style (dtd based) (also supported in Spring3) → now we learned
- By AspectJ annotation-style
- By Spring XML configuration-style(schema based) like <aop:>
3.What is Aspect?
In the enterprise level application programming we used to add different cross-cutting functionalities [cross-cutting functionalities means adding different types of services to the application at runtime automatically ]
While implementing business logic for real time applications, apart from business logic some other services also will be added to make that as enterprise level one.
Using AOP the business logic and cross-cutting functionalities are implemented separately and executed at run time as combine.
1.Aspect denotes only the cross-cutting functionality name not its implementation and all.(Like an Interface)
in above we have 3 Aspects here which are Authentication Aspect, Logging Aspect, Transaction Aspect
here we are adding 3 services to our withdraw() and deposit() methods at run time.
2.Advice is the implementation of Aspect.An Advice provides the code for implementation of the service.
Types of Advices
Method Before Advice: it executes before a join point.
After Returning Advice: it executes after a joint point completes normally.
ThrowsAdvice: it executes if method exits by throwing an exception.
Around Advice(MethodInterceptor): It executes before and after a join point.
After (finally) Advice: it executes after a join point regardless of join point exit whether normally or exceptional return.
1.Method Before Advice
- It contains implementation of the services which are applied before business logic of method is going to execute.
- During compilation time the services will not be applied to our logic, services will apply only at run time.
- In order to create a Before advice, class should implement MethodBeforeAdvice interface.
- MethodBeforeAdvice interface is given in org.sp-fw.aop.* package.
- If we implement MethodBeforeAdvice interface then we need to override a method called before() method.
- The services which are implemented in before() method are executed at before business logic.
Syntax: public void before(Method m,Object args[], Object target)throws Exception
Method m, is a class at java.lang.reflect.* package, used to access the name of the business method, through getName(),
object[] is used to access the parameter values of the business method, the parameters of business method stored in object array and those parameters are given to before() method by the container in the form of objects only.
The third parameter is an object to whom this service will be going to apply, usually this will taken care by container, as a programmer we no need to care this
- See MyOwnBusinessClass.java is our own java class file, just our business logic will goes here
- BeforeAdvice.java contains the services, what we need to execute before our business logic
- So proxy is the class generated by the container at run time, see at run time container is executing the logic of before() method from BeforeAdvice class, then our business method logic as a single class.
- In fact we cannot see this proxy class physically :-) , container will creates in the memory and gives the output normally.
2.After Returning Advice
This advice contains services which are applied after completion of our business method logic
In order to create an after returning advice in spring, our class should implement an interface called AfterReturningAdvice, given in org.sp-fw.aop.* package and we need to override a method given by this interface called afterReturning()
public void afterReturning(Object returnValue,Object args[], Method m, Object target)throws Exceptio
→ returnValue → is Return value of the Bussiness Logic
Final Crack Steps to Create AOP Application
1.Take A Class, which contains BussinessLogic() method
2.Take an Advice and implememt MethodBeforeAdvice[before()] or AfterReturingAdvice[After()]
3.Configure spconfig.xml with bussclass id and Advice class id,
Ex: <bean id=”bus” class=”buscls”> and <bean id=”advi” class=”advcls”>
4.Configure ProxyFactoryBean with id “proxy” and define target propety, and Interceptor names
<bean id="proxy" class="org.springframework.aop.framework.ProxyFactoryBean">
<property name="target" ref="bus"></property>
<property name="interceptorNames">
<list>
<value>aft</value>
</list>
</property>
5.Take a main class getBean(“proxy”) it contain all the BussinessLogic+Advice methods.
3.ThrowsAdvice
- In this type of Advice, we implement services which are executed when ever the business logic of the method throws an exception. For creating a Throws Advice our class must implement ThrowsAdvice interface.
- ThrowsAdvice is a marker interface given in org.spfw.aop.*; package, and there are no methods in this interface to provide implementation :-)
- while creating a ThrowsAdvice class in spring AOP, we should implement our services in a method called afterThrowing() with 1 or 4 parameter(s).
- In fact, afterThrowing() method is not given in ThrowsAdvice, but we should implement our services in afterThrowing() method only because when ever an Exception is occurred in the business logic then the IOC container internally calls afterThrowing() method to apply the services.
Syntax:
1.public void afterThrowing(Exception e)
2.public void afterThrowing(Method m,Object args[],Object target,Exception e)
In case of single parameter, only Exception details are accessible, but in case of 4 parameter method, apart from Exception details we can also access method name, method parameters. At the time of creating ThrowsAdvice, the method afterThrowing() can write any number of times, i mean we can write individual afterThrowing() methods for each Exception separately.
Order:
- afterThrowing(NullPointerException e) → Specific Exception
- afterThrowing(m,ar[],target,excption ) → 4 parameter Afterthroweing method
- afterThrowing(Exception e) → Common Exception
4.Around Advice
- Around Advice is combination of both Before and After Advice.
- Around Advice is not given by spring framework and it is from Open Source implementation called AOP alliance.
- To create Around Advice, our class should implement an interface called MethodInterceptor.
- In Around Advice, we implement Before and After Advice in a single method called invoke(MethodInvocation m), in order to separate Before an After services to execute business logic, in the middle we call proceed() method.
- Around Advice can access the return value of business method and it can modify the value and it can return a different value back to the client, as return type is Object, but in the After Advice its not possible right, as its return type is void.
Jointpoint
while creating the business logic of the method the additional services are needed to be injected (which we saw already) at different places or points, we call such points as join points. At a join point a new services will be added into the normal flow of a business method.
While executing the business method, the services are required at the following 3 places (generally), we call them as JoinPoints..
- Before business logic of the method starts
- After business logic of the method got completed
- If business logic throws an exception at run time
At the join point, an Aspect is injected, nothing but the implementation of Aspect i mean Advice will be injected
pointcut
for what methods what services need to be executed will be taken care by pointcut. A pointcut defines what advices are required at what join points. In fact all business methods of a class doesn’t require all services. So a pointcut informs to the IOC container that what business methods of a class needs what type of services.
we have 2 types of pointcuts in AOP
- Static Pointcut
- Dynamic Pointcut
Pointcut verifies whether a particular method of particular class is eligible for getting the advice or not
It means the pointcut verifies the class names and method names, but not run time parameters of the method. in spring AOP we have 2 static pointcut classes
- NameMatchMethodPointcut
- RegxpMethodPointcut
Above 2 classes are predefined static pointcut classes given by spring AOP framework. These classes are just going to verify whether the method name is matching with given condition or not, but these 2 classes doesn’t check whether the class names are matching or not. According to the predefined static point cuts, they wont verify the class name is
matching or not but makes all classes eligible to get advices by default.
The problems of JDBC API are as follows:
- We need to write a lot of code before and after executing the query, such as creating connection, statement, closing resultset, connection etc.
- We need to perform exception handling code on the database logic.
- We need to handle transaction.
- Repetition of all these codes from one to another database logic is a time consuming task.
Spring JdbcTemplate eliminates all the above mentioned problems of JDBC API. It provides you methods to write the queries directly, so it saves a lot of work and time.
spring-JDBC layer will take cares about connection management and error managements, and programmers will concentrate on their logics bla bla.
while working with spring-JDBC, the programmer no need to open and close the database connection and it will be taken care by the spring framework.
In JDBC application can get connection with database using following 2 ways
By using java.sql.DriverManager [ Class ]
By using javax.sql.DataSource [ Interface ]
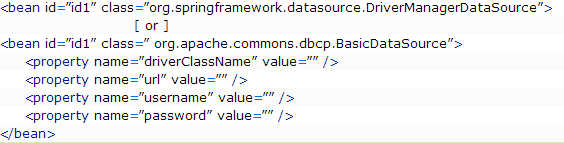
Spring framework uses DataSource interface to obtain the connection with database internally, i mean we will use any one of the following 2 implementation classes of DataSource interface.
Org.springframework.jdbc.datasource.DriverManagerDataSource [ class ]
Org.apache.commons.dbcp.BasicDataSource [ class ]
1.DriverManagerDataSource is given by spring framework and it is equal to DriverManager class, it means spring framework internally opens a new connection and closes the connection for each operation done on the database
2.BasicDataSource is given the apache, and this is better than DriverManagerDataSource because BasicDataSource having inbuilt connection pooling implementation.
In spring config we need to configure the following 4 properties to obtain connection with database
1.Spring Jdbc Approaches
Spring framework provides following approaches for JDBC database access:
- JdbcTemplate
- NamedParameterJdbcTemplate
- SimpleJdbcTemplate
- SimpleJdbcInsert
- SimpleJdbcCall
1.JdbcTemplate class
It is the central class in the Spring JDBC support classes. It takes care of creation and release of resources such as creating and closing of connection object etc. So it will not lead to any problem if you forget to close the connection
JdbcTemplate class provided the following 3 type of methods to execute SQL operations on the database
execute() → returns void
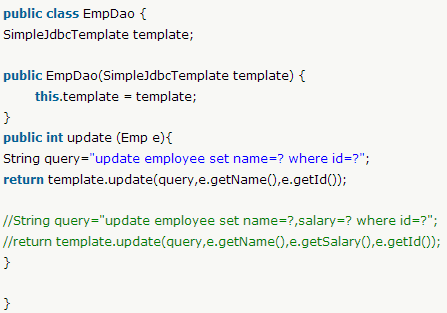
update() → returns int
query() methods….
execute and update methods are for non-select operations
query method is for select operations on the database.
JdbcTemplate class depends on DataSource object only, as it will opens database connection internally with DataSource. So we must give this DataSource object to JdbcTemplate, actually we have both setter, constructor injections in JdbcTemplate class for inserting DataSource object.
Steps:
- Select a Table for Operatins(Emp--> sno,name,sal)
- Create EmpBean with SETTER/Getters
- Take a EmpDAO, which conatins JdbcTemplate for doing DB Operations and Methods for Operations
- in Jdbc.xml configre
- DriverManagerDatasource bean Object with driverclassname,url,uname,pwd properties
- we have to Pass DriverManagerDatasource bean Object to JdbcTemplate for Connections
- configure our DAO class with their properties and ref=”jdbcTemplate”
- Take Main Method class, and getBean , and call appropriate method
1.execute(Static sql)
This method is used to execute both DDL [ select ] and DML[ non-select ] operations on the database
execute() method allows only static sql commands as parameter, it not contain ?
for DML[ non-select ] operations this method doesn’t return the count value to the programmer

(i)PreparedStatement in Spring JdbcTemplate
- For doing PreparedStaatement operations we have an Interface PreparedStatementCallback interface
- In contains only one method → public <T> doInPreparedStatement(PreparedStatement ps)
- for exceuting preparedStatement we use jdbcTemp.excecute(qry, new PreparedStatementCallback(){ })
- Here new PreparedStatementCallback(){ } is annonumous class which implemets doInPreparedStatement()
2.update( dynamic sql )
update() method accepts either static or dynamic sql commands as parameter, Returnts int
3.query methods of spring JdbcTemplate
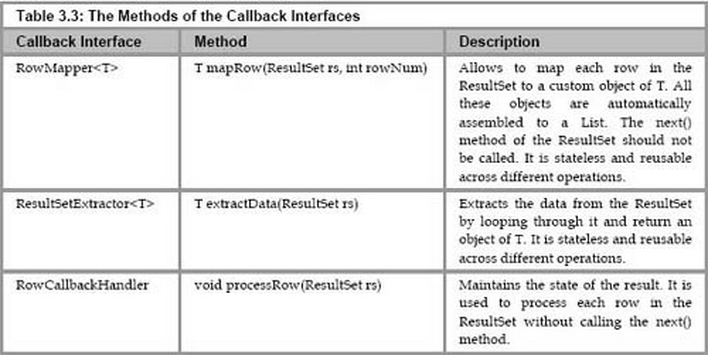
1.ResultSetExtractor
syntax : public T query(String sql,ResultSetExtractor<T> rse)
ResultSetExtractor interface can be used to fetch records from the database. It accepts a ResultSet and returns the list.
It defines only one method extractData that accepts ResultSet instance as a parameter. below:
public T extractData(ResultSet rs)throws SQLException,DataAccessException

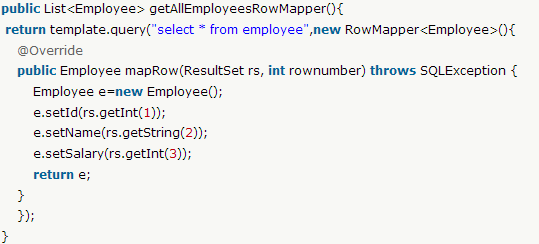
2.RowMapper
Like ResultSetExtractor, we can use RowMapper interface to fetch the records from the database using query() method of JdbcTemplate class. In the execute of we need to pass the instance of RowMapper now.
Syntax : public T query(String sql,RowMapper<T> rm)
RowMapper interface allows to map a row of the relations with the instance of user-defined class. It iterates the ResultSet internally and adds it into the collection. So we don't need to write a lot of code to fetch the records as ResultSetExtractor.
Sysntax : public T mapRow(ResultSet rs, int rowNumber)throws SQLException
RowMapper saves a lot of code becuase it internally adds the data of ResultSet into the collection.
2.NamedParameterJdbcTemplate
Spring provides another way to insert data by named parameter. In such way, we use names instead of ?(question mark).
Ex: insert into employee values (:id,:name,:salary)
In NamedParameterJdbcTemplate class we have only one method
pubic T execute(String sql,Map map,PreparedStatementCallback psc)
3.SimpleJdbcTemplate
Spring 3 JDBC supports the java 5 feature var-args (variable argument) and autoboxing by the help of SimpleJdbcTemplate class.
SimpleJdbcTemplate class wraps the JdbcTemplate class and provides the update method where we can pass arbitrary number of arguments
Syntax: int update(String sql,Object... parameters)
We should pass the parameter values in the update method in the order they are defined in the parameterized query.
Spring provides API to easily integrate Spring with ORM frameworks such as
1. Hibernate
2. JPA(Java Persistence API),
2. JPA(Java Persistence API),
3. JDO(Java Data Objects),
4.Oracle Toplink
5.iBATIS.
1.Hibernate and Spring Integration
In hibernate framework, we provide all the database information hibernate.cfg.xml file.
But if we are going to integrate the hibernate application with spring, we don't need to create the hibernate.cfg.xml file. We can provide all the information in the applicationContext.xml file.
The Spring framework provides HibernateTemplate class, so you don't need to follow so many steps like create Configuration, BuildSessionFactory, Session, beginning and committing transaction etc.
So it saves a lot of code.
Employee e1=new Employee(111,"arun",40000);
hibernateTemplate.save(e1);
Steps:
1.Take a Database Table (Emp → sno,name,sal)
2.Write POJO/Bean class for those properties [EmpBean] with Setters/Getter s
3.Create an DAO class which having HibernateTemplate Object, with Gutters&setters and DB operation methods
4.In methods call CURD Operations with template.save(ob),template.update(ob),template.delete(ob).. Etc.,
5.create emp.hbm.xml mapping file for hibernate and table mappings
6.Imp steps in spconfig.xml file, we configure
- DriverManagerDatasource bean Object with driverclassname,url,uname,pwd properties
- Configure LocalSessionFactory for getting Hibernate Session,transaction objects
- pass datasource,mappingResources,hibernate properties(dialect,ddl,show sql etc)
- Configure HibernateTemplate by passing SessionFactory bean object for hibernate functionality
- configure our DAO class with their properties and ref=”hibernateTemplate”
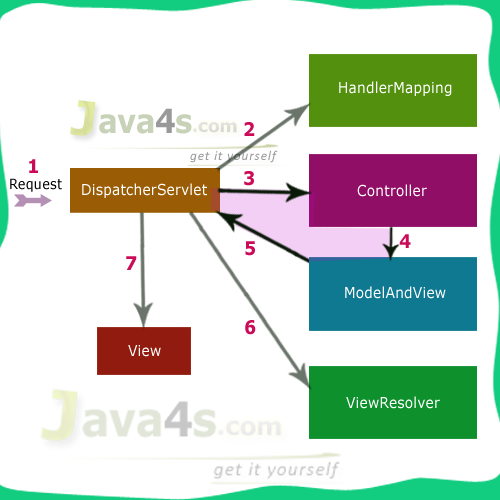
1.Spring MVC 3.2 Execution Flow
Step 1: First request will be received by DispatcherServlet
Step 2: DispatcherServlet will take the help of HandlerMapping and get to know the Controller class name associated with the given request
Step 3: So request transfer to the Controller, and then controller will process the request by executing appropriate methods and returns ModeAndView object (contains Model data and View name) back to the DispatcherServlet
Step 4: Now DispatcherServlet send the model object to the ViewResolver to get the actual view page
Step 5: Finally DispatcherServlet will pass the Model object to the View page to display the result
@Controller annotation marks this class as Controller. This is at the Top of the class
@Requestmapping annotation is used to map the class with the specified name.At the top of ModelAndView()
Steps:
1.Create an Index.jsp , which contains link <a href="java4s.html">
2.take a Contoller class with method which returns ModelAndView Object, and at the top give @RequestMapping("/hello")
3.Return ModelAndView Object with viewpagename
4.Create View.jsp, page for view
5.configure web.xml with DispatcherServlet, with some name, ex: welcome
6.cretae welcome-servlet.xml, which is spring configuration file, whose name is servletnameinweb.xml-servlet.xml
7.this welcome-servlet.xml contains ViewResolver with prefix and suffix
The context:component-scan element defines the base-package where DispatcherServlet will search the controller class.
Here, the InternalResourceViewResolver class is used for the ViewResolver.
The prefix+string returned by controller+suffix page will be invoked for the view component.
JavaMail → Spring Mail
RMI → Spring RMI, HTTP INVOKER
JMS(Java MSG Service) → Spring JMS